Building a Simple Timer with Vanilla JavaScript
Nothing can teach you more about a certain technology than actually using it to build something. If you are new to JS, this simple timer application can actually make you a lot familiar with JS concepts. So, let's dive in!

Understanding the Logic
So we all are familiar with what a timer or a stopwatch is. It is used to measure the time elapsed between its activation and deactivation. Usually, the time is either displayed in hh: mm: ss or hh: mm: ss: mmm format. We'll be using the former.
Now, the main function is to make sure the time gets updated correctly. For that, the most important logic is as follows:
- We'll start with making sure to set the interval for 1000 ms as 1000ms = 1s
- Increment seconds by 1 for every interval.
- When seconds hit 60, increment minutes by 1 and set seconds to 0 again (60 seconds = 1 minute).
- When minutes hit 60, increment hours by 1 and set minutes to 0 again (60 minutes = 1 hour).
We'll be starting with creating an HTML file called index.html and a simple HTML5 boilerplate in it for this project. The CSS styling will be done inside the style.css file and the JavaScript functionality will be inside the timer.js file.
index.html
In the body, we'll be having a div with a container class which will act as a wrapper for our Timer. Our body tag will also include the timer.js script at the bottom so that the HTML elements required before JavaScript runs, will already be present in the DOM.
<body>
    <div class="container">
       <!--code goes here... -->
    </div>
    <script src="timer.js"></script>
</body>
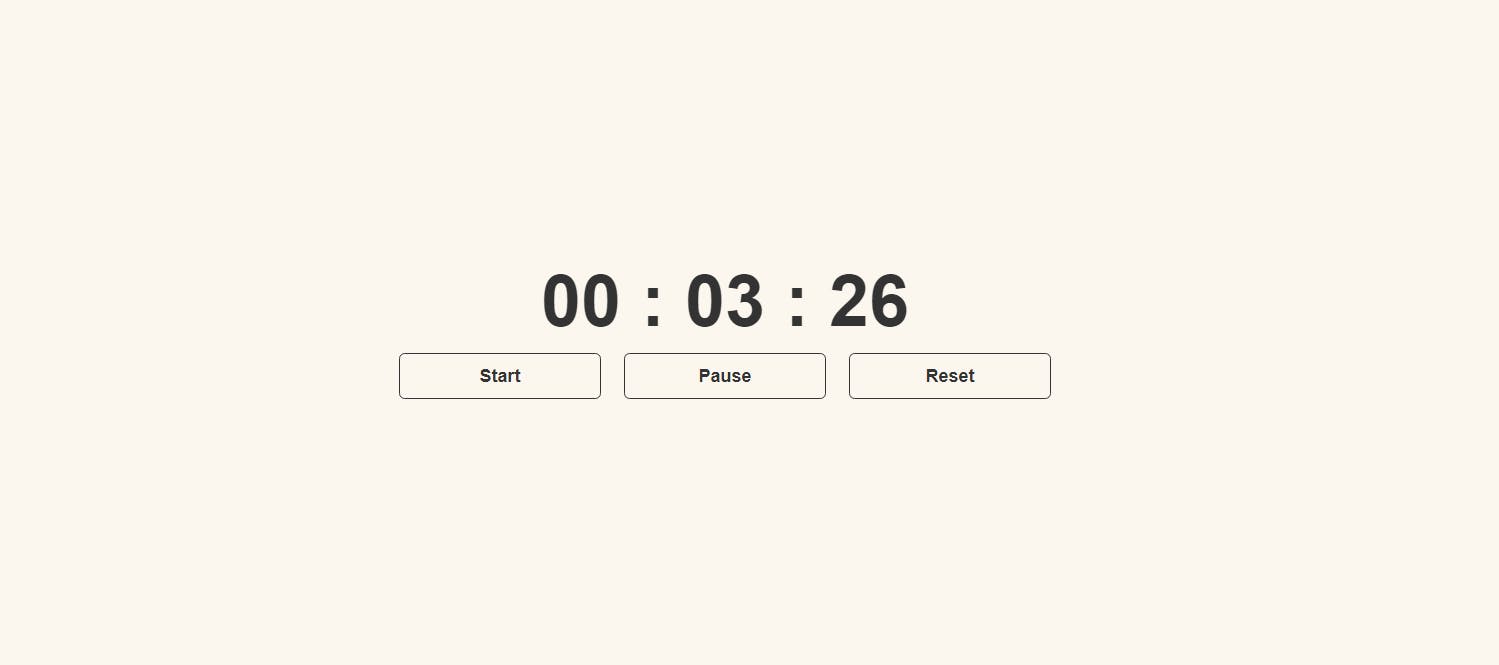
Inside the class container, we'll have 2 more divs; one to display the timer and the other to display the controlling buttons.
The three buttons are: start, pause, and reset.
<div class="container">
        <div class="timer">
            00 : 00 : 00
         </div>
        <div class="timer-buttons">
            <button id="start">Start</button>
            <button id="pause">Pause</button>
            <button id="reset">Reset</button>
          </div>
        </div>
    </div>
style.css
For this project, I went with a rather simple design. You can use the same styling or notch it up with your own creative design!
*{
    margin: 0;
    padding: 0;
}
body{
    box-sizing: border-box;
    font-family: 'Roboto', sans-serif;
    display: flex;
    justify-content: center;
    align-items: center;
    background-color: rgb(252, 247, 238);
}
.container{

    width: 100%;
    height: 100vh;
    max-width: 1200px;
    display: flex;
    justify-content: center;
    align-items: center;
    flex-direction: column;
}
.timer{
    font-size: 4rem;
    font-weight: bold;
    color: #333;
    width: 100%;
    max-width: 1200px;
    display: flex;
    justify-content: center;
    align-items: center;
    flex-direction: column;
}
.timer-buttons{
    width: 50%;
    max-width: 1200px;
    display: flex;
    justify-content: center;
    align-items: center;
}
.timer-buttons > button{
    width: 100%;
    max-width: 1200px;
    display: flex;
    justify-content: center;
    align-items: center;
    flex-direction: column;
    font-size: 1rem;
    font-weight: bold;
    color: #333;
    background-color: rgb(252, 247, 238);;
    border: 1px solid #333;
    border-radius: 5px;
    padding: 10px;
    margin: 10px;
    cursor: pointer;
    transition: all 0.5s ease-in-out;
}
.timer-buttons > button:hover{
    background-color: rgb(240, 215, 169);
}
timer.js
After setting up the structure and the styling let's add some functionalities to make our project run!
We are going to start with declaring 7 variables wherein 3 will hold values for hours, minutes, and seconds, one variable 'stopstatus' will either have 0 or 1 value according to the active state of the timer and the last 3 variables will be used to get the buttons from the DOM.
let seconds = 0;
let minutes = 0;
let hours = 0;

let start = document.getElementById('start');
let pause = document.getElementById('pause');
let reset = document.getElementById('reset');

let stopstatus = 0;
Next, we'll get the div element timer from the DOM to update it on the page.
let timer = document.querySelector('.timer');
The first function we'll be implementing is the start function, which will get fired when the START button is clicked. As discussed above, the logic will be implemented accordingly.
start.addEventListener('click', ()=>{
    if(stopstatus!==0){
        clearInterval(stopstatus);
    }
    stopstatus = setInterval(()=>{
        seconds+=1;
        if(seconds === 60){
            seconds = 0;
            minutes++;
            if(minutes === 60){
                minutes = 0;
                hours++;
            }
        }
    let h = hours < 10 ? ("0" + hours ): hours;
    let m = minutes < 10 ? ("0" + minutes) : minutes;
    let s = seconds < 10 ?("0" + seconds) : seconds;
    timer.innerHTML = ` ${h} : ${m} : ${s}`;
},1000);
});
The second function is the pause function, it'll get fired up when the PAUSE button is clicked.
pause.addEventListener('click', ()=>{
    clearInterval(stopstatus);
});
The last function is the reset function, it'll get fired up when the RESET button is clicked. This function will rest back the timer to 00:00:00 .
reset.addEventListener('click', ()=>{
    clearInterval(stopstatus);
    seconds = 0;
    minutes =0;
    hours = 0;
    timer.innerHTML = '00 : 00 : 00 ';
});
Full JavaScript code:
/* variables for the timer */
let seconds = 0;
let minutes =0;
let hours = 0;
let start = document.getElementById('start');
let pause = document.getElementById('pause');
let reset = document.getElementById('reset');
let stopstatus = 0;
/* DOM element to update timer */
let timer = document.querySelector('.timer');


/* function to start the timer */
start.addEventListener('click', ()=>{
    if(stopstatus!==0){
        clearInterval(stopstatus);
    }
    stopstatus = setInterval(()=>{
        seconds+=1;
        if(seconds === 60){
            seconds = 0;
            minutes++;
            if(minutes === 60){
                minutes = 0;
                hours++;
            }
        }
    let h = hours < 10 ? ("0" + hours ): hours;
    let m = minutes < 10 ? ("0" + minutes) : minutes;
    let s = seconds < 10 ?("0" + seconds) : seconds;
    timer.innerHTML = ` ${h} : ${m} : ${s}`;
},1000);
});


/* function to pause the timer */
pause.addEventListener('click', ()=>{
    clearInterval(stopstatus);
});

/* function to reset the timer */
reset.addEventListener('click', ()=>{
    clearInterval(stopstatus);
    seconds = 0;
    minutes =0;
    hours = 0;
    timer.innerHTML = '00 : 00 : 00 ';
});
Hope you found this tutorial helpful. I also post tips and resources on Twitter regularly. If you are interested, do check out my Twitter handle @aahiknsv. Thank You!

